
Negative Notions: Proper digitization of stereoscopic negatives for parallel viewing
written for the stereosite by Ian Ference
Foreward
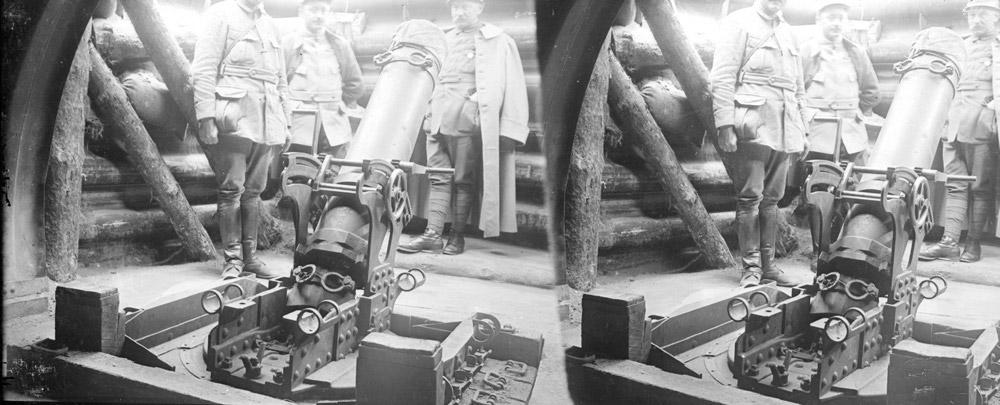
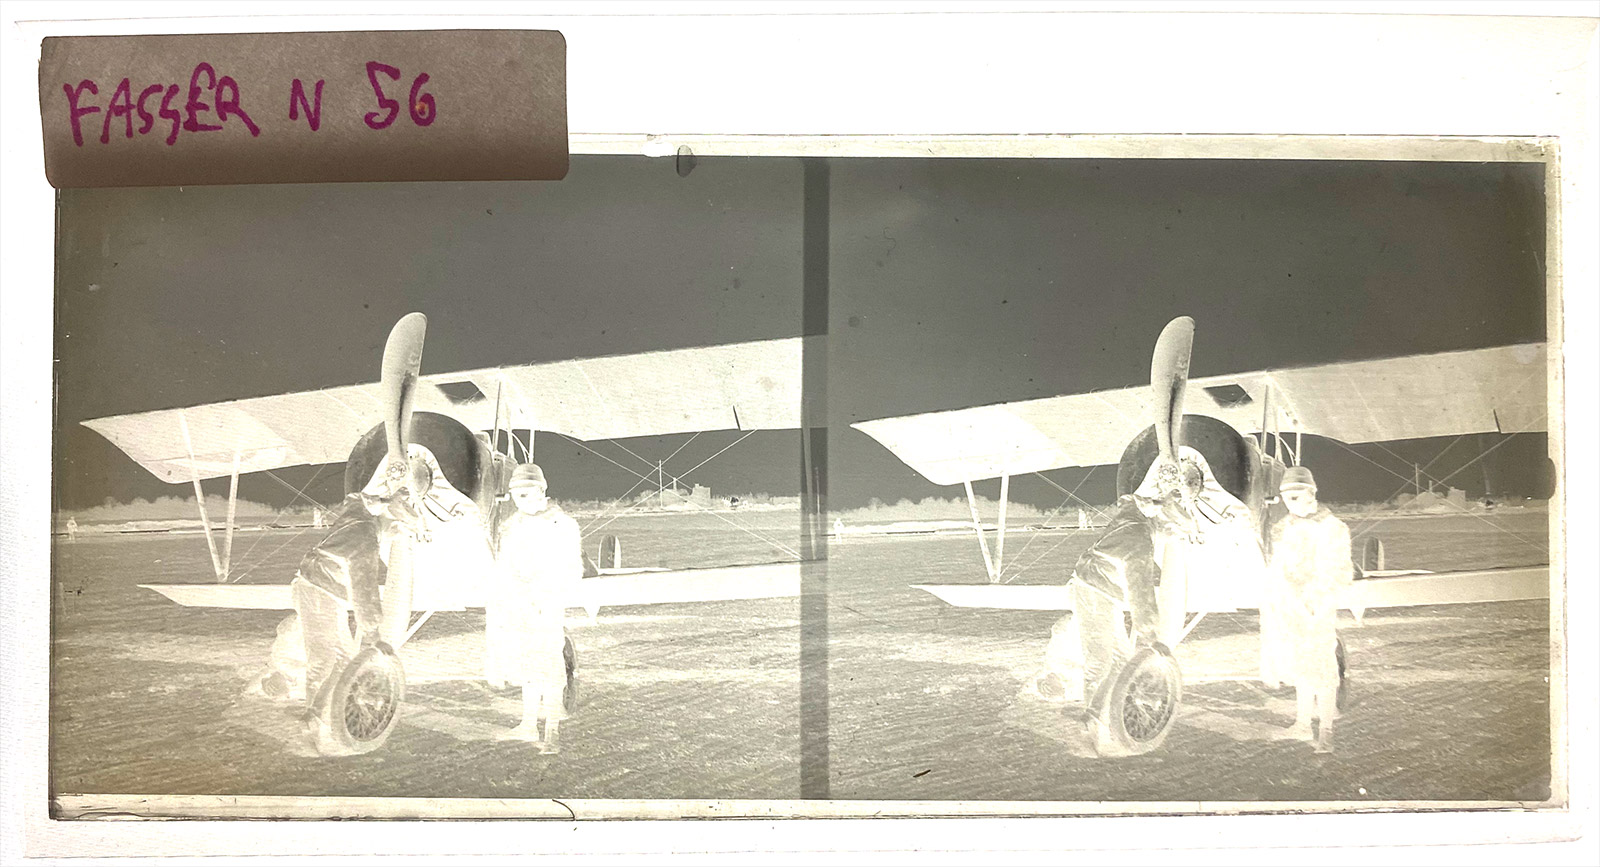
My interest in stereography is primarily informed by two things – my background as a photographer, and historic studies of the Great War. For this reason, I have amassed quite a few stereoscopic negatives from ~1914–1921. The image I am using for the practical demonstration is designated “FasserNeg56”, a part of the Alexander Otto Fasser Collection, the most impressive and important of the many amateur Great War stereography collections in the Boyd/Jordan/Ference Collection. It depicts a Nieuport 10 sesquiplane being worked on by the crew, and has a corresponding positive that you can view on my personal blog. Needless to say, it is of great historic importance, as are the other 136 negatives in this particular set.
Your interest may be elsewhere. While the images used in this article are of the war, and from the Fasser collection, the techniques are universal. Whether your interest is in travel stereoscopy, 3D erotica, or macro stereoviews, the theory and practice described below apply equally well to all single-substrate stereoscopic negatives.
Introduction
Stereoscopic negatives are, by nature of their creation, trickier dragons to conquer than are those made by traditional two-dimensional cameras. They are vicious chimeras, products of distinct photographic and stereographic processes, and difficult to tame, especially when we talk of those in European-style. What do I mean by “European-style”? Simply that both parts of the stereo pair appear on the same substrate – usually glass. American and British stereographers often used large-format cameras to produce paper cards. These cameras would create two negatives, one for each taking lens. These are not difficult at all to print (or digitize). For the remainder of this article, I will be referring to European-style single glass negatives. The theory, of course, also applies to celluloid negatives.
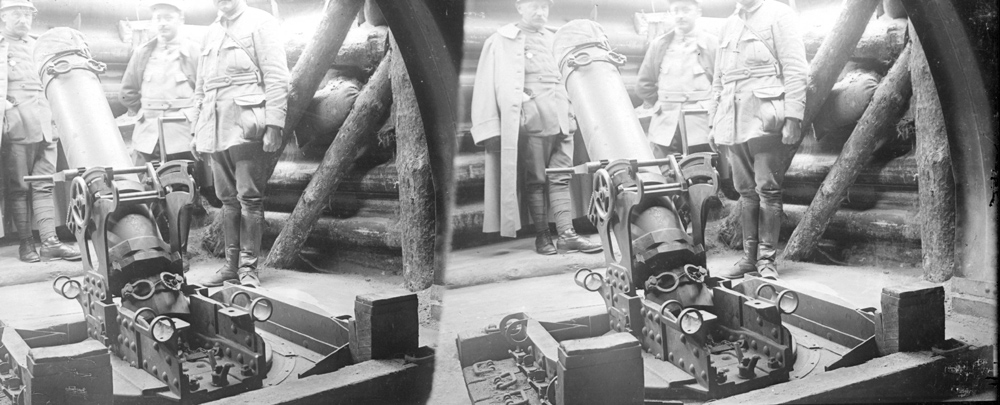
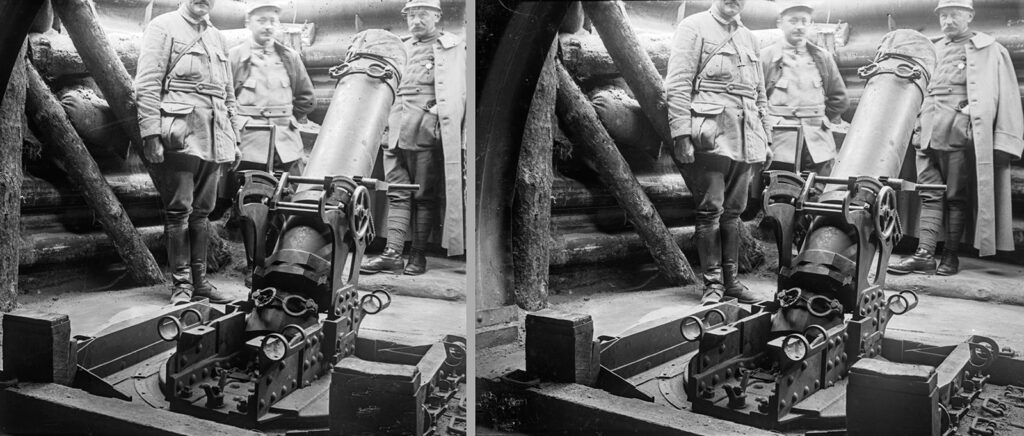
Most sample scans of negatives made by sellers on auction sites are abjectly terrible. The above image represents a better-than-average attempt to digitize a stereoscopic negative, made by my late friend Doug Jordan. However, as you examine it, you should be struck by three problems. Most obviously, the exposure is terrible – you don’t even need to attempt to view the image to see that! Next, upon attempting to parallel view the scene, you’ll notice that you cannot – it will either appear flat or cause eye-strain. The panels are reversed, and it appears as if it were a cross-view image! This is not correct. Finally, upon careful study, you might think that the soldiers standing about the mortar are wearing their medals backwards. They aren’t – each panel is actually a mirror image, and the entire stereoview is flipped horizontally! From the same negative, a decade later, I created the following digital version, without much pain or effort:
In addition to proper exposure in “developing” the digital negative – an analogue to the darkroom concepts of exposing, using contrast filters, choosing a developer, etc – knowledge of how lenses work, and application of that knowledge to the more complex stereographic setting, allows me to quickly and easily flip the entire “digital print” horizontally and then exchange the panels to create a nice representation of what I perceive as the original photographer’s intent. Keep in mind that this involves some artistic interpretation on my part – just like real darkroom work! But once ones grasps the theory intuitively, putting it into practice makes digitizing stereo negatives more exciting than digitizing stereo positives. Instead of being a pain in the arse, it’s an opportunity to exercise creativity and decision making in interpreting the negative into a final work. To the end of making this accessible to everybody, I will first discuss the theory behind creating stereoscopic negatives, before addressing the practice of properly digitizing them.
Theory
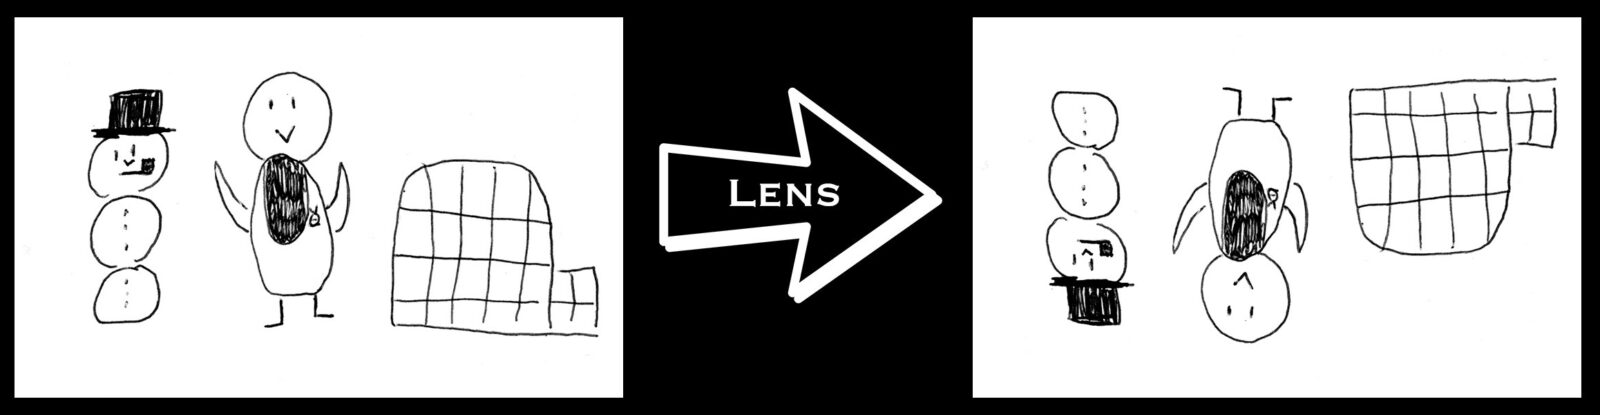
Your eyes are lenses. What hits the back of your eye is an upside-down representation of what you are seeing; your visual cortex steps in and sorts it for you. You may not know this, but camera lenses do the same thing. Because many people prefer digital photography these days, you may not have strips of negatives lying around to proof that effect. So I will demonstrate with a silly little cartoon drawn by my wonderful wife Stacey.
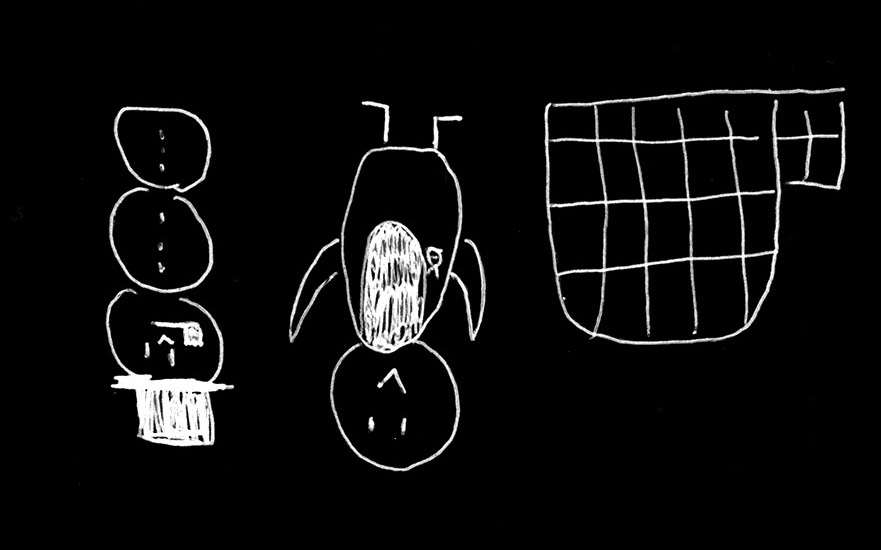
After developing a negative, you’ll wind up with a piece of glass (or celluloid) which looks like this:
You can then make a contact print from the negative, with the emulsion side of the negative facing the emulsion side of the printing substrate (usually paper or glass). This has the effect of again inverting the darks to lights, as well as the effect of reversing the image – which faithfully reproduces the scene:
Now all you must do is take the print in front of you and rotate it 180º and voila! – a faithful representation of the scene. Our penguin, igloo, and snowman are all in their right place. Following from this, you might think that the same process should work on a stereoscopic negative. If you go into your darkroom and try it, you will get a disappointing result similar to the first scan shown in this article, though not identical:
Two of the flaws of the initial image are still apparent: the exposure is terrible and the panels are reversed.So what of the third flaw – why is it not the case that on the contact print, the entire stereoview is flipped horizontally? The answer is simple: Contact printing is not analogous to making transparency scans on modern scanners. In making a contact print, or enlarging, the image is naturally horizontally reversed. This makes up for the inversion of the image. Scanning is predicated on making an isomorphic representation of the physical object. This is why emulsion-side-down diapositive scans look just like the original transparency – and why scans of negatives are always reversed.
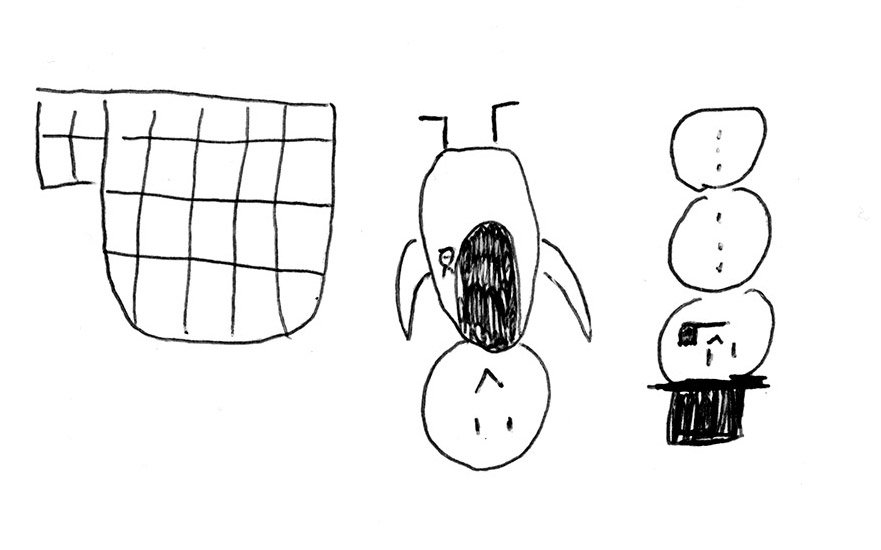
However, we still need to address the transposition of the panels – why the heck does neither a contact print nor a digital scan produce a proper stereoscopic image, free-viewable in parallel or in more detail through a scope? The answer to this goes back to the notion of the fact that the European-style stereoscopic negatives under consideration consist of two images on a single substrate. Let’s consider our silly penguin cartoon again – but this time, let’s consider photographing it with a glass-plate stereoscopic camera. Let’s presume that the penguin is at the zero plane, the igloo is closer to us (negative parallax), and the snowman is farther away from us (positive parallax). What we want is to obtain a stereoview that looks like this:
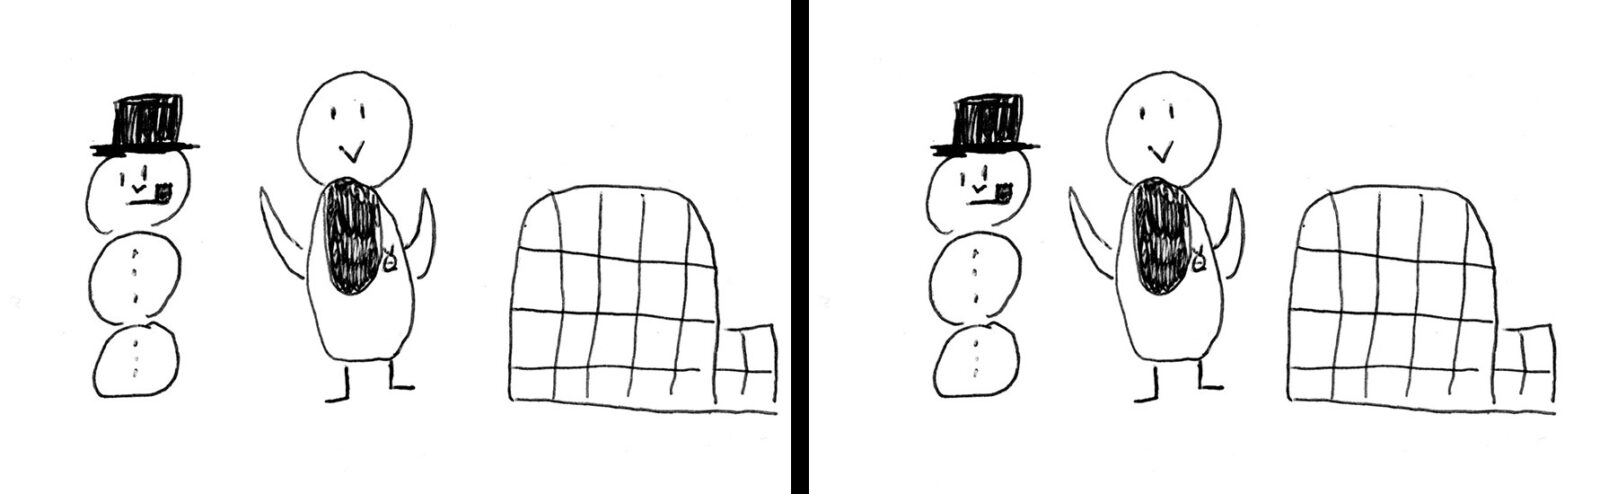
But let’s see what happens when we load up a glass plate and click the shutter:

Both images are taken simultaneously, and the light creates a stereoscopic negative on our single glass plate:
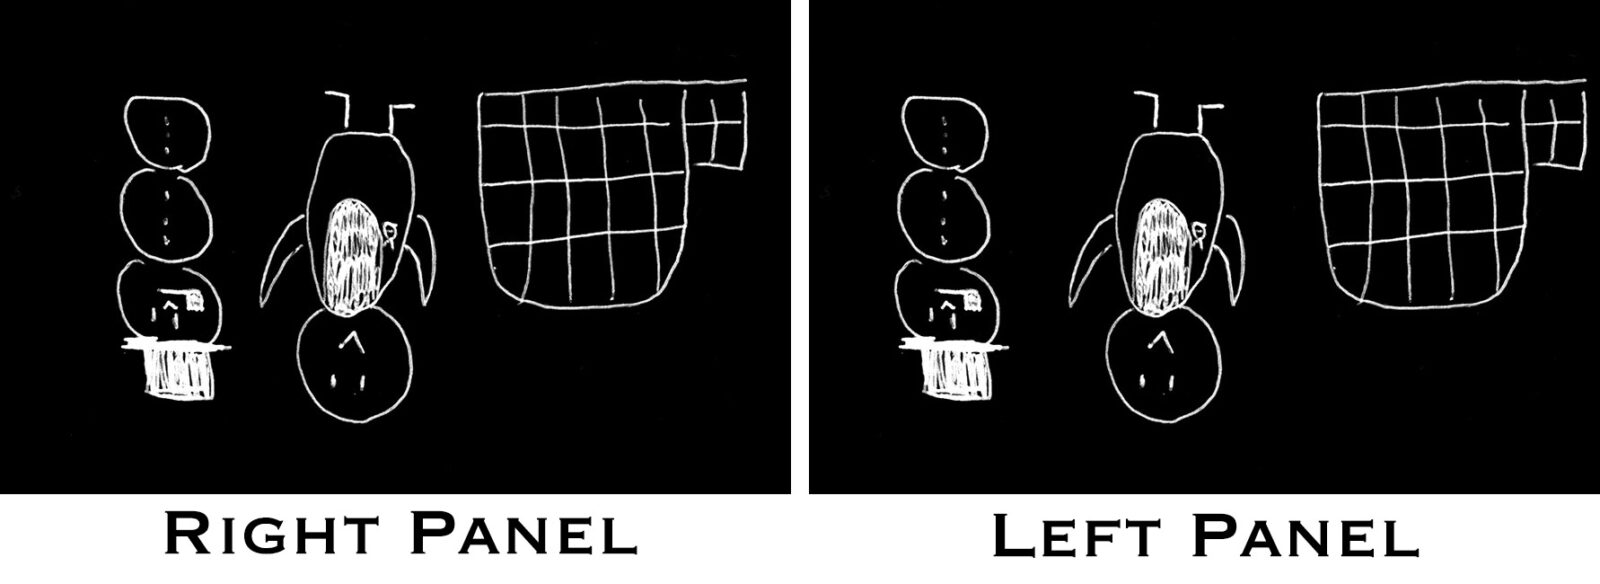
Wait a minute – it says “right panel” on the left, and “left panel” on the right? Worry not that your sanity is slipping away, dear reader. What we’re looking at here is the emulsion side of the negative. What the left lens saw is on the right; what the right hand lens saw is on the left. Visualize yourself standing in front of a stereoscopic camera and this should intuitively make sense. If you’re thinking that this might have something to do with the image transposition discussed above, you’re on the right track. But to demonstrate, we’ll go ahead and make a contact print from this negative, rotated 180º as we would with a flat negative:

Uh-oh! This doesn’t look like the above stereoview, and for a very salient reason: in rotating it so that the figures appear upright, we have placed the exposure made by the left-hand lens on the right, and the image made by the right-hand lens on the left. This is the reason that many stereoviews (positives) printed by amateurs from single glass plates appear to be slightly misaligned – they are! One side would have to be printed off the opposite side of the negative, and then the other, each while the positive plate was half-masked. Now that we understand the processes by which stereoscopic negatives are created, we can hopefully better appreciate that although it takes a bit more work, we can make amazing digital recreations from the negatives in the “digital darkroom”.
Practice
What follows is an examination of the process I use in creating the best possible digital positives from stereoscopic negatives. It must be noted that, as with most things in digitization (as well as the traditional darkroom), your mileage may vary as regards available equipment and tools (software) – and that one’s own individual aesthetic can come into play heavily when processing from a negative. As stated previously, a negative has far more data than a positive – and therefore, is far more open to interpretation when printing or digitizing it. The process of scanning a positive is a study in creating as close to a reproduction of the original work as is possible. The process of creating a digital positive from a scan of a negative is an interpretive process. My own aesthetic is to create true B&W works from B&W negatives, unless I have a corresponding positive that shows the photographer’s intent to tone or tint the image. But it all starts with the scan.
Scanning
For most positive scans, it is sufficient to scan directly to JPEG or TIFF format – minor alterations can of course be made, but generally you’re just looking for an accurate reproduction of what is already established. However, negatives are far more silver-dense than are positives. In this dense silver, there is a lot more data. That’s why it is essential to use software that can scan to the Adobe DNG (digital negative) format, because this is the only current format that adequately represents the amount of data contained in the density of a negative. I prefer SilverFast, an inexpensive and powerful software bundle that allows direct use of the scanner bed in “transparency – glass” mode:

SilverFast also offers the option of multipass scanning – that is to say, taking two passes over the negative to capture maximal detail – which is another option not offered by the lousy software bundle that’s usually delivered with a scanner. In any case, the most essential aspect of any scanning software is its ability to create Adobe DNG files. Once you have picked a software product, it’s time for the fun to begin. Here’s my workflow, in order:
- Clean the negative and scanner bed. This may seem like a no-brainer, but most glass slides purchased from online auctions, estate sales, and so on are at least somewhat dirty. Pure water (not tap!) can be used on the clear side of the glass, by application with a microfiber cloth. On the emulsion side, a dry cloth is preferable, but a little water vapor from breathing can come in handy with tough dirt / smoke damage. Always err on the side of caution. Also make sure your scanner bed is clean and free of dust; a blower bulb can be your best friend.
- Place the negative emulsion-side down and make a preview scan. If you’re not using a scanner/software combo that allows for placement directly on the scanner bed, you may have to use a holder to hold your negative. These are often problematic, as the image area of a negative can cover an entire plate and thus be blocked by the holder; when possible, use the direct scan method. In any case, use preview scans to select the image area and make sure that, upon eyeballing it, the slide appears to have 0.1º or less variance from being completely straight. Every major action performed after the image is in your editing software – such as unnecessary rotations to correct for sloppy scanning – only degrades image quality.
- Double-check your settings. Accidentally scanning to the wrong folder or with the wrong image name only causes headaches. But much more importantly, make sure you’re utilizing the entire Adobe RGB color space (more on why you should scan B&W negatives in color later), and scanning at a high enough resolution. I recommend 4800 ppi if possible, multipass to DNG in 48 bit color.
- Check your environment. If someone in the flat above you is thumping their bass, you’re running appliances which create vibrations (air conditioners, loud phonographs, old hard drives on the same table), and so on, you’re liable to get a lesser-quality result.
- Hit the scan button. You’ll probably have to wait 15+ minutes for the result. Don’t forget to check each scan before removing the slide from the scanner – it might be the case that you need to rescan for any number of reasons. Best to make sure you have a good base scan before cleaning and placing your next slide!
And that’s it – you should now have a DNG file that looks altogether unlike the original negative. But don’t worry about that; in our next step, you can make it look like the original negative if you want – but you’ll probably want to improve on it. One of the few upsides to modern technology is that it’s much easier to improve on a dodgy negative by making a digital negative and properly processing it. At the very least, it wastes less photographic paper!
“Developing”
Although it is common parlance in the digital world to refer to processing a digital negative as “developing” the file, this is rather silly – you are already working on a negative that was developed before you were born. Much better to refer to it as processing in my opinion. But I digress. This is the step where you do most of the fundamental work of making the image look nice – that is to say, correcting the bad exposure that we identified as one of the three major flaws of most negative scans. Most stereoscopic negatives are scanned direct to JPEG or TIFF. Our interim step allows you to do things that you can do in the darkroom – but instead of dictating that you want greater edge acutance by using Agfa Rodinal instead of Ilford ID11, you slide a little slider bar to the right.
In order to process a DNG file, you’re going to need software. I use Adobe Photoshop CS6; others prefer Adobe Lightroom after I convinced him into scanning to DNG. There are generally somewhat inferior free products available as well. The aforementioned Adobe products are easily obtained in certain fashions, but doing so is outside the scope of this article. In any case, I will be using Photoshop for purposes of explaining my workflow; feel free to try the product of your choice and experiment – that’s half the fun anyhow, is it not?
This is what FasserNeg56 looks like when opened in CS6:
And when opened in Photoshop, and inverted (Command‑I):
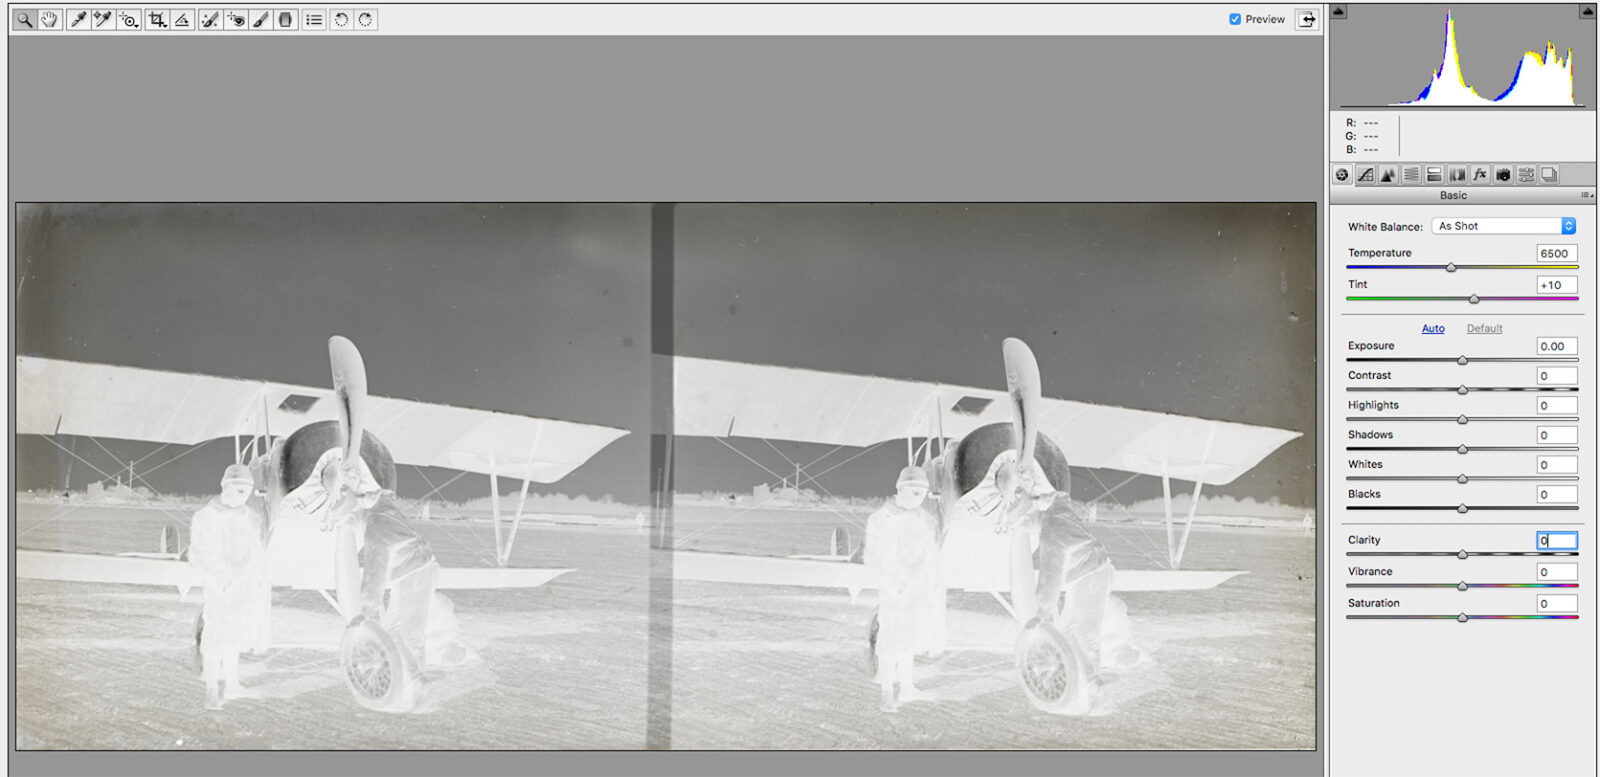
Not too impressive, but rather characteristic of what you get if you don’t put in the work in editing. Did I mention yet that you’ll be learning to edit in reverse? You will. But that’s not as daunting as it sounds, if it sounds daunting at all – those who are still nostalgic about their time in the darkroom are probably looking forward to it, for though the smell of fixer is not present, the adventure of injecting oneself into an image certainly is. Those sliders you saw above, and the ones on the other panels – these are your “digital darkroom” tools. Exposure is analogous to the amount of light you use when enlarging or making a contact print. Contrast is the overall contrast of the image, whereas Clarity is similar to edge acutance – the contrast at border regions between light and dark.
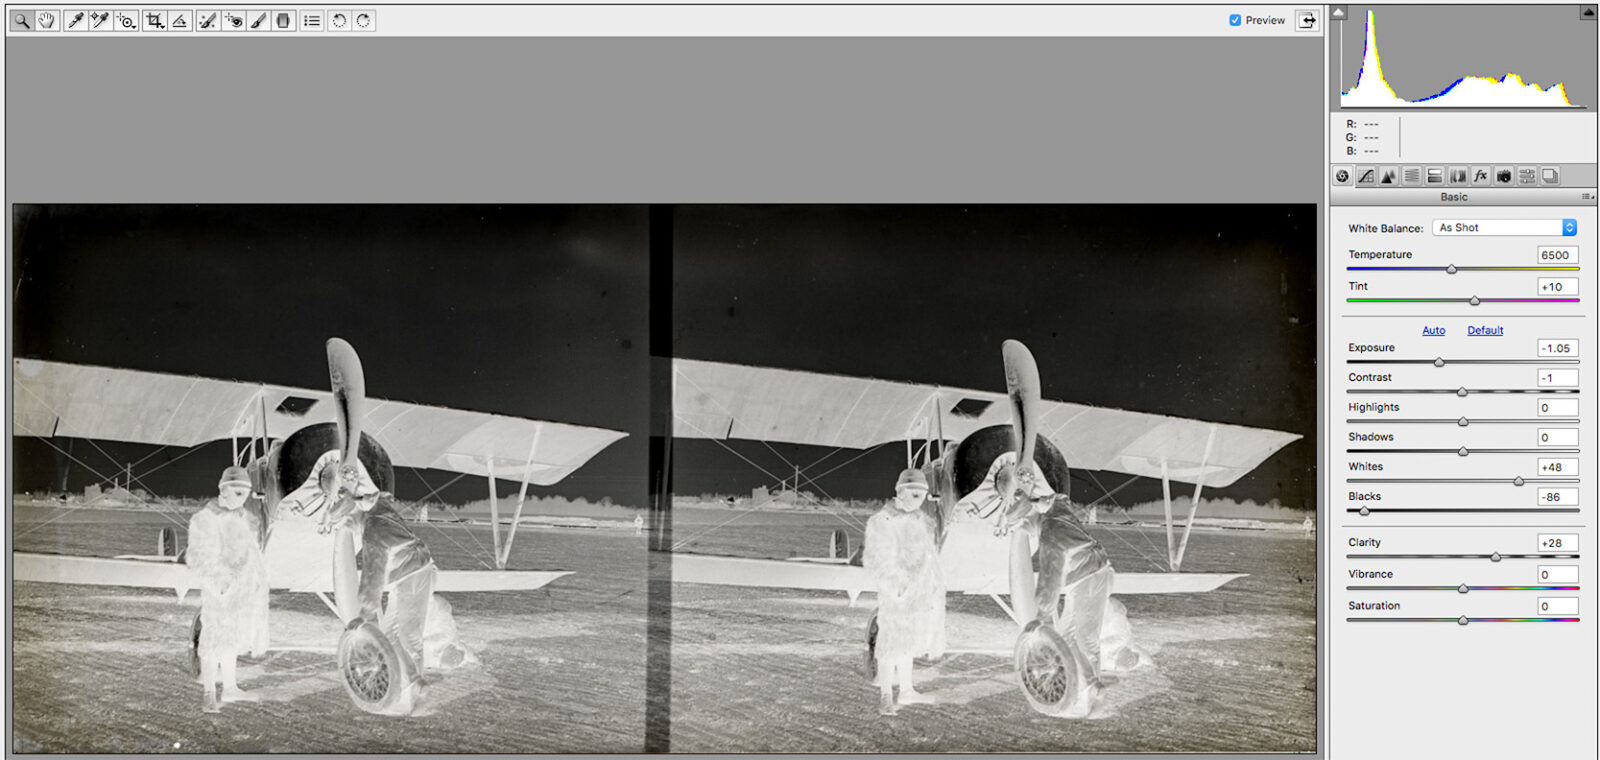
In any case, the best means of becoming experienced in the use of these newfangled sliders is by playing around with them – much like experimenting in a traditional darkroom! It took me dozens of tries to get what I wanted out of the first stereoscopic negative I scanned; by my 20th I was getting it in one or two attempts. You learn to previsualize what will come out the other side using this trial-and-error method, much as when you learned photography, you learned to previsualize how a given scene would look with whatever lens and film you were shooting. My final sliders for this image look like this:
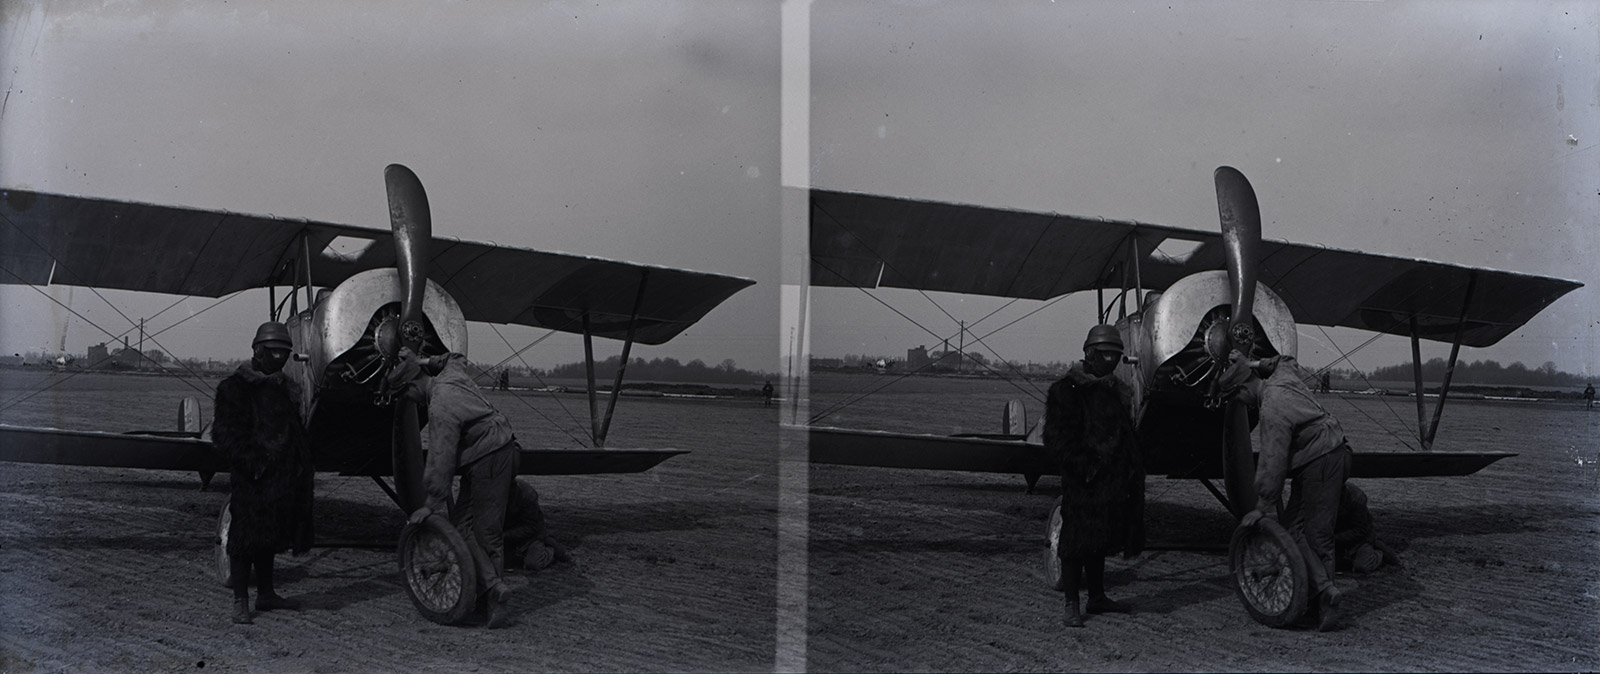
With the end product (having been inverted) looking like this:
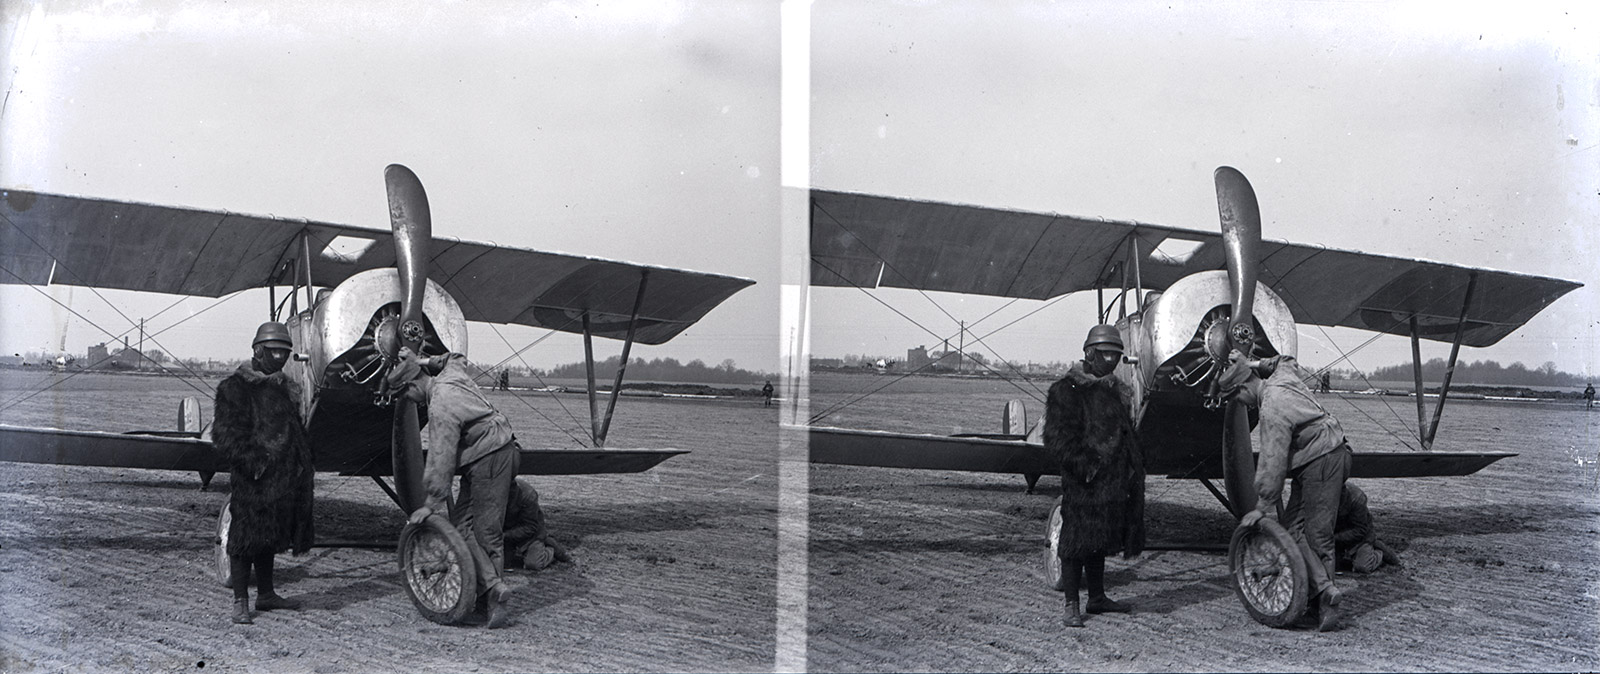
Is this the correct exposure, contrast, balance, et cetera? There is no answer to this question; even though a positive exists for this image, we don’t know that it was how the photographer (known to be Alexander Otto Fasser) wanted the image printed. As an American in Neuilly, it it far more probable that he had the plates developed and printed by a Parisian pro lab than that he took time away from his surgical duties to do darkroom work himself. Thus, this particular print is my interpretation of Fasser’s negative, and can’t be otherwise. And this is one of the little-known (these days) joys of working with the negatives of another – one may, or indeed must, inject themselves into the creative process. Once you’ve refined your own creative process, you’ll be ready for the final steps to prepare a pleasing parallel-viewable positive for digital display or printing.
Finishing Touches
So now we have a proper exposure at high resolution; we have overcome one of the three major obstacles discussed in the introduction. With Photoshop, GIMP, or another software project, we can complete the final three steps. The first step is simple – flip the slide horizontally:
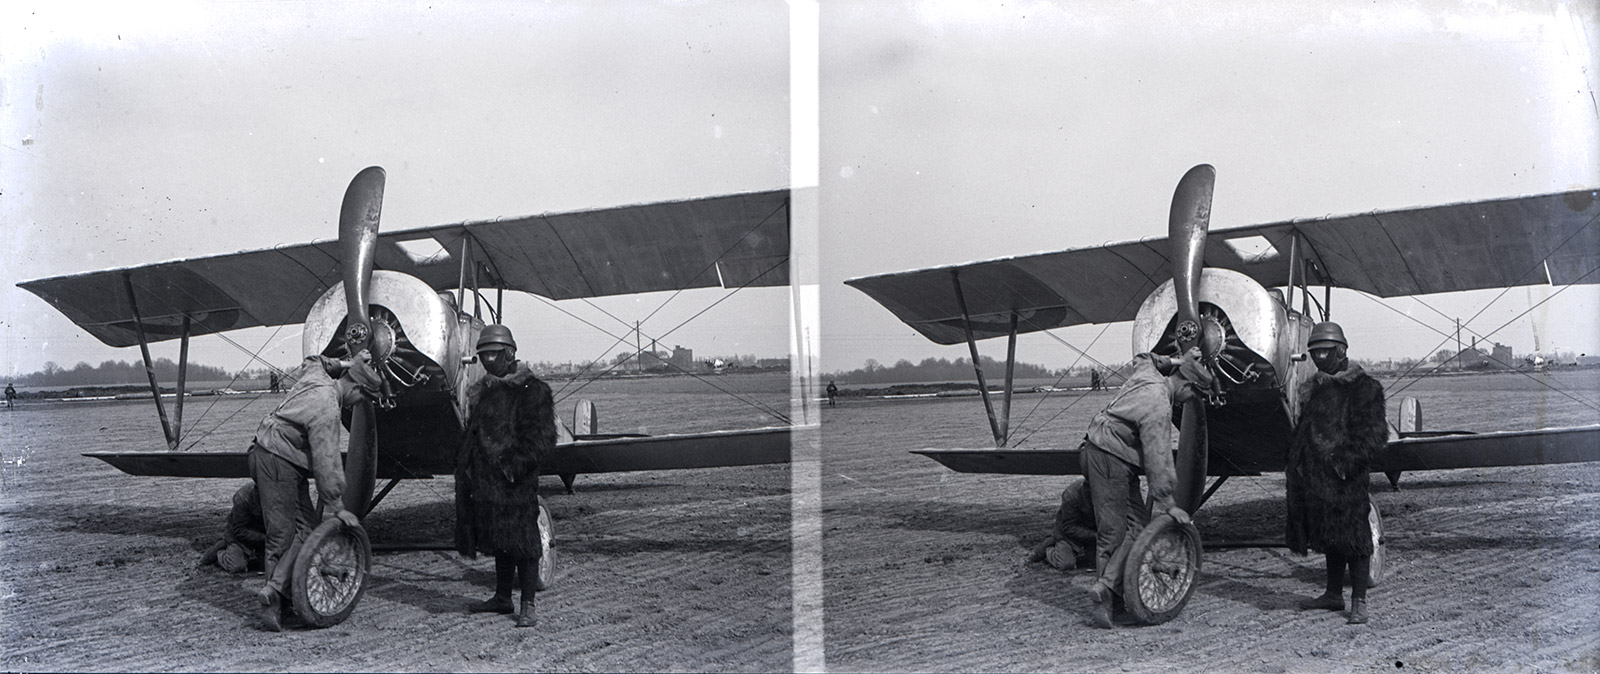
Only one problem to go! But first we must account for the slide’s oxidation. The second step is somewhat more complex, and may vary depending on the software product you are using. Remember that we scanned to 48-bit color space, instead of simply making a greyscale scan. This has left the oxidized silver on the inverted image appearing as a blue/cyan fog over parts of the image – usually the periphery. In Photoshop, using the “Black & White” function in “Adjustments” brings up the following menu:
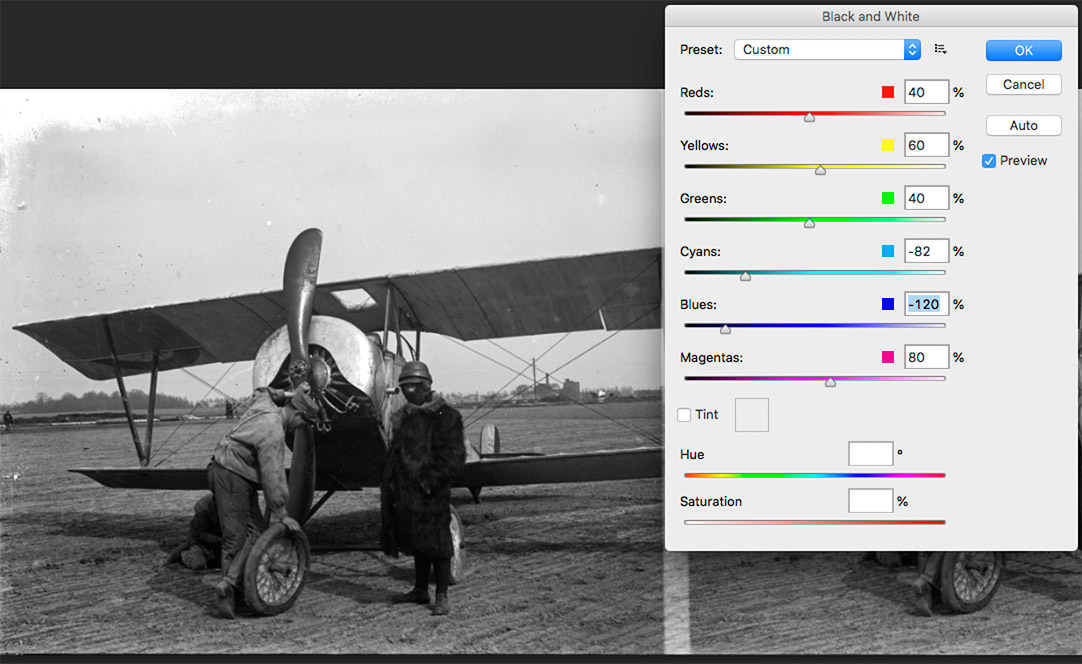
And the cyan and blue sliders can be used to achieve a tonal match with the rest of the image, whereas a straight greyscale scan would not have allowed this! This can also be achieved in any number of other ways, including in the DNG processing stage. I chose this method because it is simplest to demonstrate; all that matters is that whatever means you use, you remove as much of the visible oxidation as is possible. We are only one step away from creating a final image that we can be proud of. We must now do the third step – swapping panels and cropping. This is simple to do in any image editing software; I will share my Photoshop workflow, but you may follow whatever makes logical sense to you – just don’t do anything to compress the image! I start out by selecting the entire image area, copying it, and opening a new document (which uses the pixel dimensions of the original, and will use whichever color I choose for the interstitial area between panels). I then copy what appears to be the right-hand side of the scan, and paste it into the left side of the new document:

Note that I carefully moved the newly transposed panel until all of the central overlap area was covered – this does mean a tiny amount of image loss, but that is more than made up for in creating a pleasant viewing experience. I then copy-paste the left-hand panel from the scan into the right side of the new document, and simply crop off the overlap area. Then I flatten the image, and am left with:
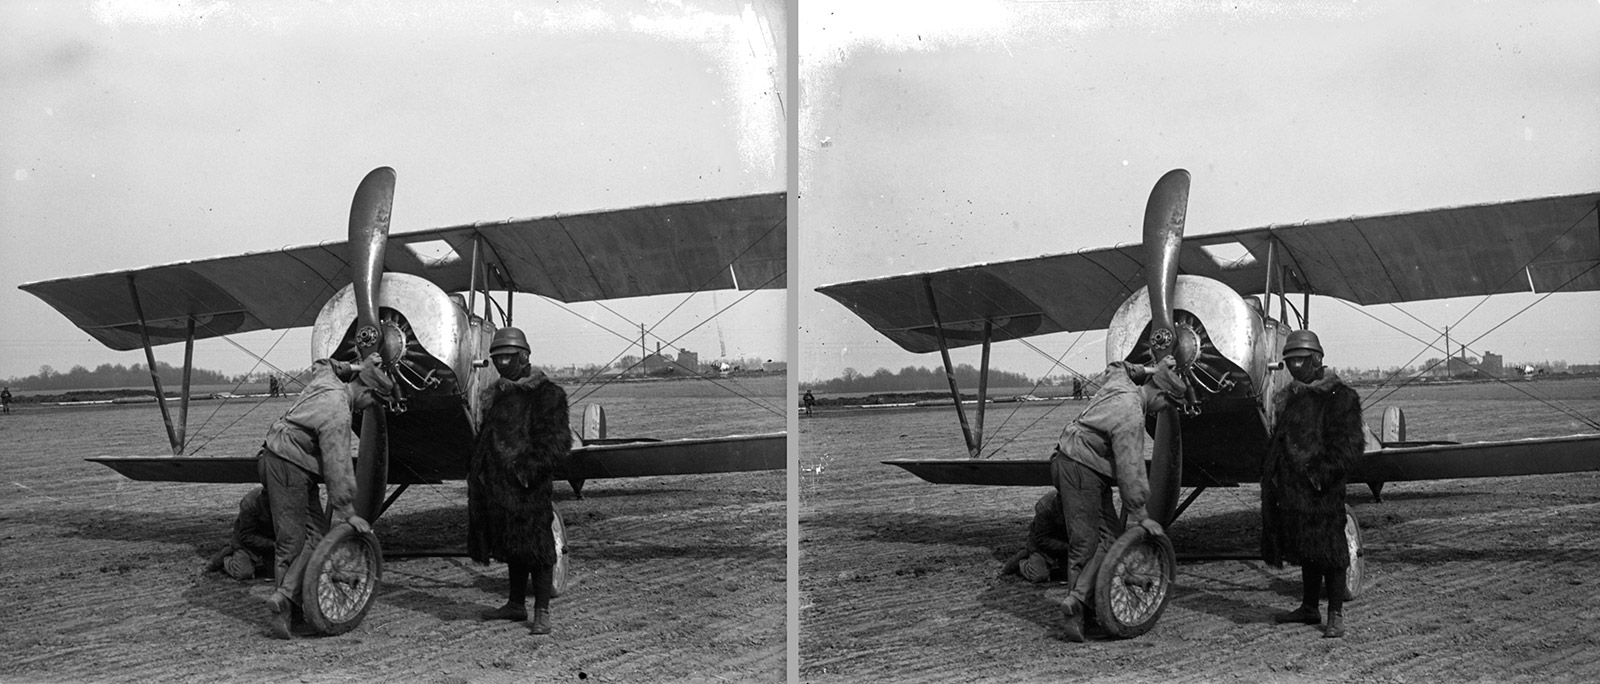
Of course, there is more that one can do to improve on this image. But retouching stereoviews is a topic for another article; suffice it to say that practicing these techniques and workflow allows one to process numerous stereoscopic negatives in an hour, rather than spending hours on each. There are a number of other things I could include here; for example, during the transposition step, it is very easy to paste the second panel on top of the first, deselect the red channel on that layer, and instantly have a pleasing anaglyph. If this makes intuitive sense to you, then you might wish to add it to your workflow, but for brevity’s sake I discluded it from this article.
Conclusion
It is a shame that the mid-century pivot away from stereography (View-Master and Realist aside) has left a knowledge gap that has rendered most digitized stereoscopic negatives ill-exposed, transposed, and backwards. Most archives do not have a specialist capable of creating proper parallel representations, and thus many are listed in finding aids but obnoxiously unavailable for viewing. Those archives that do digitize their negatives sometimes get the exposure right, but rarely properly flip and transpose, leading to the appearance of flatness and backwards imagery. Readers who come from professional archival backgrounds should be able to quickly improve their skillsets, and thus improve the quality of digital representations on their archives’ webpages.
Many stereoscopic negatives linger on auction sites for months or years; it is likely that the overwhelming majority of these negatives have no corresponding positive still extant, and thus are basically “lost artifacts”. But things once lost can again be found, and hopefully this article will inspire some readers to seek out stereoscopic negatives within their field of interest, digitize them, and make them available to the public. Not only is this a public good, in that it helps to preserve history, but it is a much more fun and creative process than merely digitizing positives. Just refrain from bidding against me when it comes to negatives portraying the Great War!
Afterward
For those of you who were intrigued by the theories behind the creation of stereoscopic negatives and how that impacts their digital processing, there are further venues of exploration available. In terms of theory of analog photography, lighting, lens function, lens aberrations and coatings, and darkroom technique, I highly recommend Aaron Sussman’s The Amateur Photographer’s Handbook. The title might include ‘amateur’, but the sheer volume of information readily approaches the entirety of some of my comrades’ BA programs. Mine is an 8th edition, published in 1973, and handed down to me by my father. I’m sure other editions are equally wonderful. And for those with any questions or who wish to discuss any of this subject matter further, please reach out by email: ian@stereosite.com.
Ian Ference (Crown Heights, Brooklyn)
I have been “into” stereography for the last 30 of my 39 years; for the last ten I have been a serious collector. In 2018, I put my love of sharing knowledge into action when I launched my blog, Brooklyn Stereography. When my closest friend and collecting partner Doug Jordan passed away in January 2020, I accepted stewardship of the Boyd/Jordan/Ference Collection. I hope be able to add to and grow the collection, including a permanent endowment for the online entity, before my own demise. Most of my 3D efforts are put into maintaining and building this collection, and into researching Great War stereography in general. Secondary areas of specialization within historic stereography include Raumbild-Verlag and VistaScreen, among others.
Websites: brooklynstereography.com, greatwarin3d.org
Instagram-profile: ianference