
Stereo Window basics
written for the stereosite by David Kuntz, USA
Stereo photography is a bit more demanding than traditional flat photography, because a poorly rendered 3D image can be difficult or unpleasant to view. So, the stereo photographer has to take additional steps, not required with flat photos, to avoid the problems that lead to viewer discomfort. The good news is that understanding a couple of relatively simple concepts will allow you to consistently produce 3D images that are easy to look at, and have good 3D impact. And, once you’ve absorbed these ideas, it won’t take you any time at all to routinely perform the actions necessary to accomplish this.
What is the Stereo Window?
The series of three photos shown here illustrate a key 3D photography concept that affects viewing comfort, namely, the stereo window. Imagine that your screen has a rectangular hole in it, and you’re viewing the 3D content in this image through it. That is, you’re seeing the boy pointing his finger at you through a window in your screen. The lattice of green lines in each image lies in the plane of your screen; in other words, your eyes see the green lines as being the same distance from you as your screen itself.
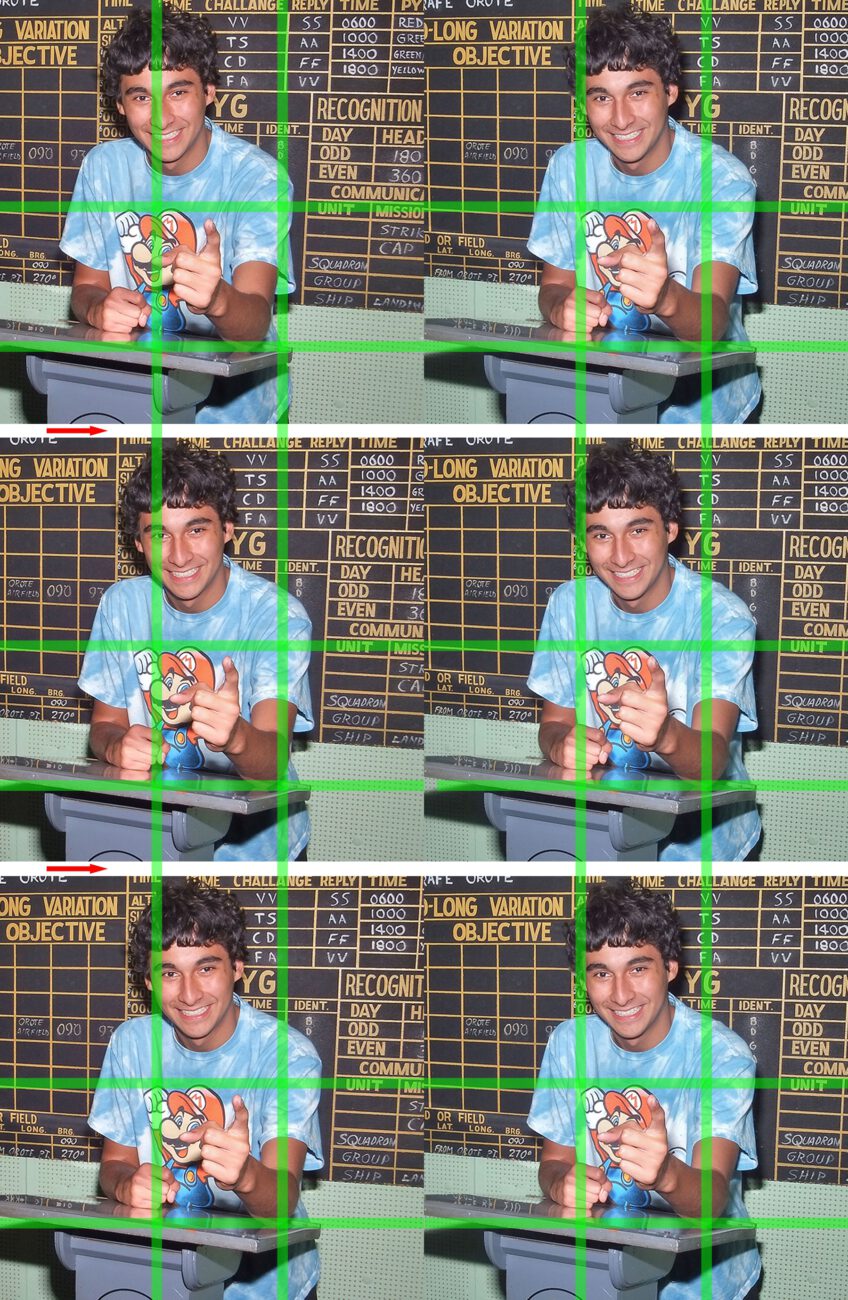
In the first 3D image pair (on top), the boy’s hand (which is the closest object in the composition to you), appears behind the green lines, or behind this window. In the next stereo pair (the middle), his finger has been moved closer, so that his fingertip is right at the plane of the window; the exact same distance from you as the green lines. In the last 3D image (bottom), his fingertip has now come through the window, and is closer to you than the green lattice of lines.
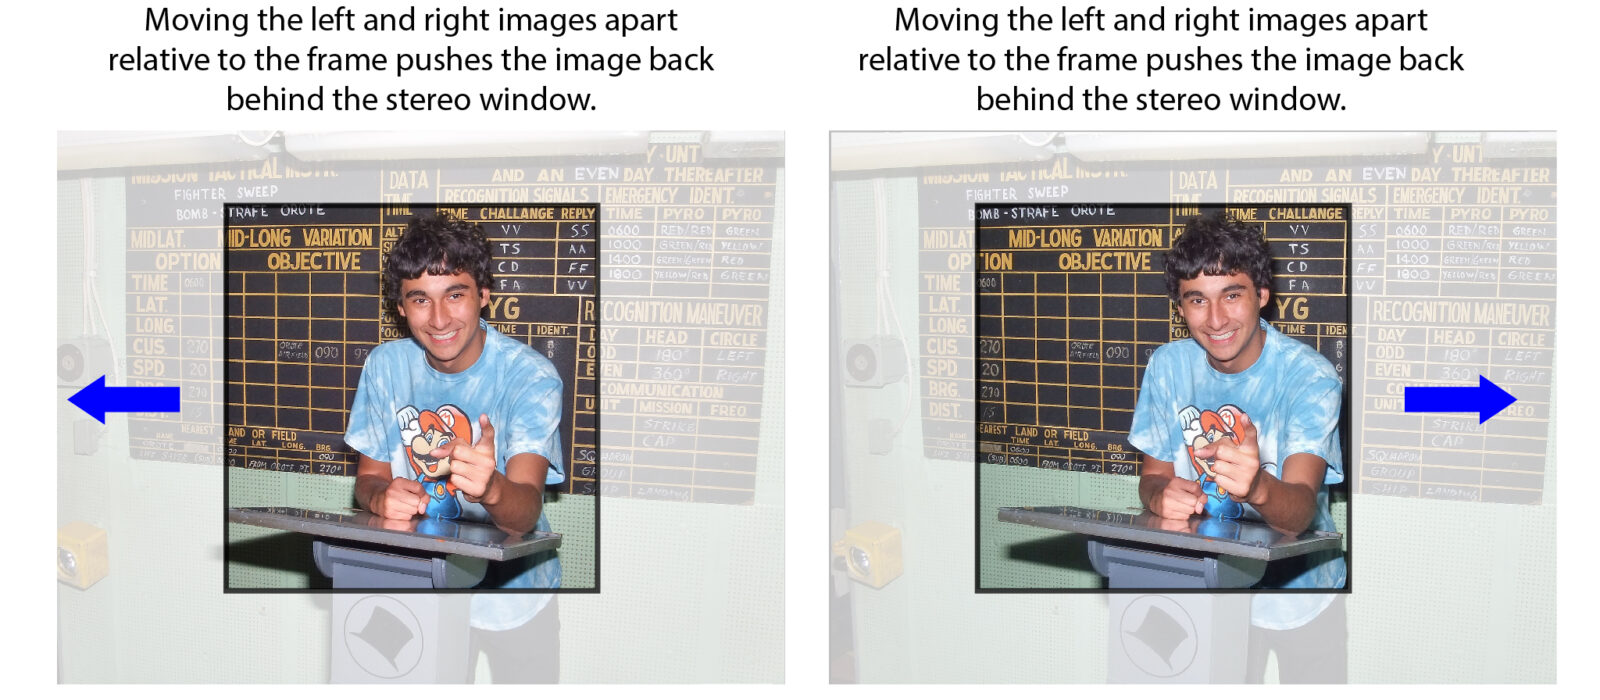
These three 3D images are all the same photo. So, how did this transformation in terms of their depth relationship to the stereo window (or plane of the screen) between them occur? The little red arrows between the photos indicate how it works. If you compare the position of the boy’s eyes in each of the left side images with the leftmost green vertical line, you can see that the entire image has been moved slightly to the right in each successive pair. The right side image doesn’t move at all. This is possible because the original photo has lots of additional material off the left and right edges that is being cropped off here.
This cropping, and how it relates to the window is shown again in the next two photos. Here, you can see this image is cropped down quite a bit (in other words, there’s lots more in the original image that’s not being shown outside the frame of the crop). But, by sliding the image left/right relative to cropping rectangle (or stereo window), the depth relationship of the subject matter with respect to the window is changed. What is not changed, however, is the depth relationship of elements within the composition itself (such as the perceived depth distance from the tip of the boy’s finger to the background). Those were set when the image was originally taken, and cannot be subsequently changed. All, that’s happening here is an adjustment in the relationship of the image content with respect to the frame it’s contained in.

Why worry about the Stereo Window?
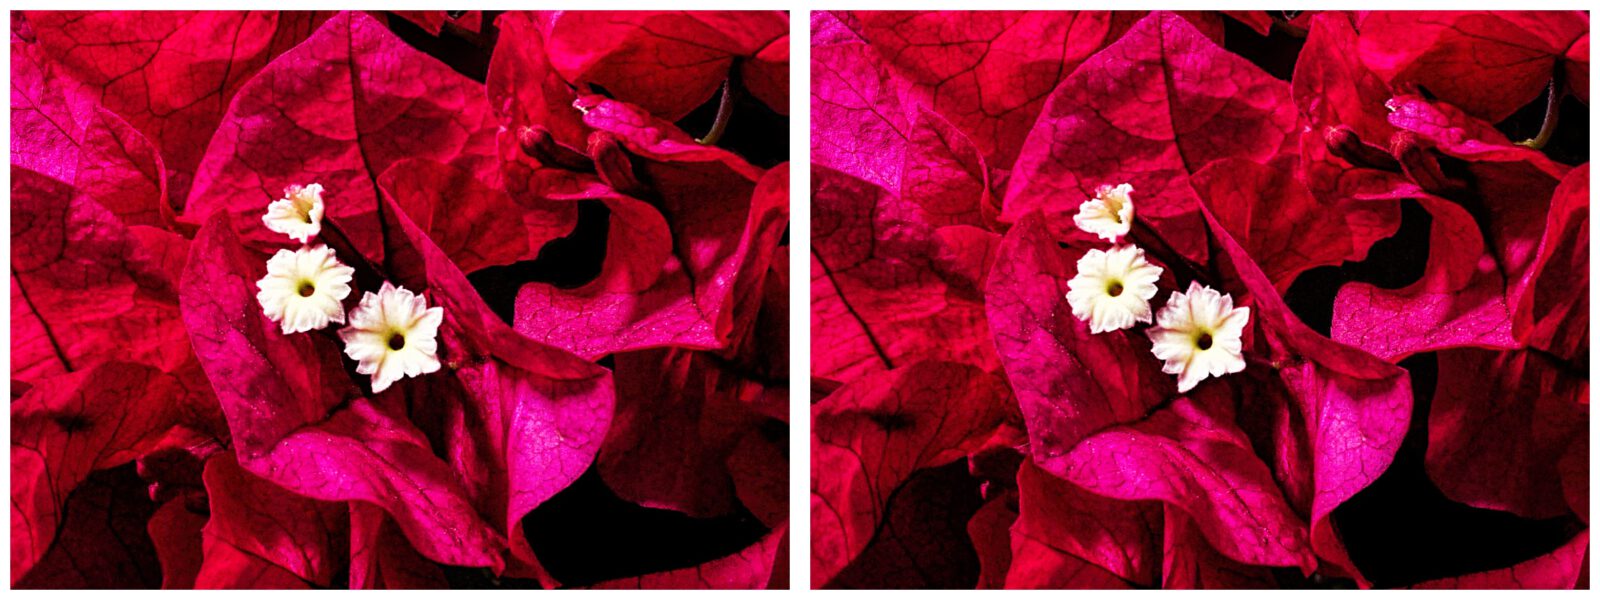
The next series of photos is intended to demonstrate why you should care about the positioning of the stereo window relative to your photo. In the first one, the flower petals at the edge of the frame are in front of the stereo window. This causes a bit of visual confusion, especially at the left edge of the frame. There’s also some “shimmering” at the frame edges, because there’s so much image material that shows up at the edge of one image that doesn’t appear at the corresponding edge of the other image.
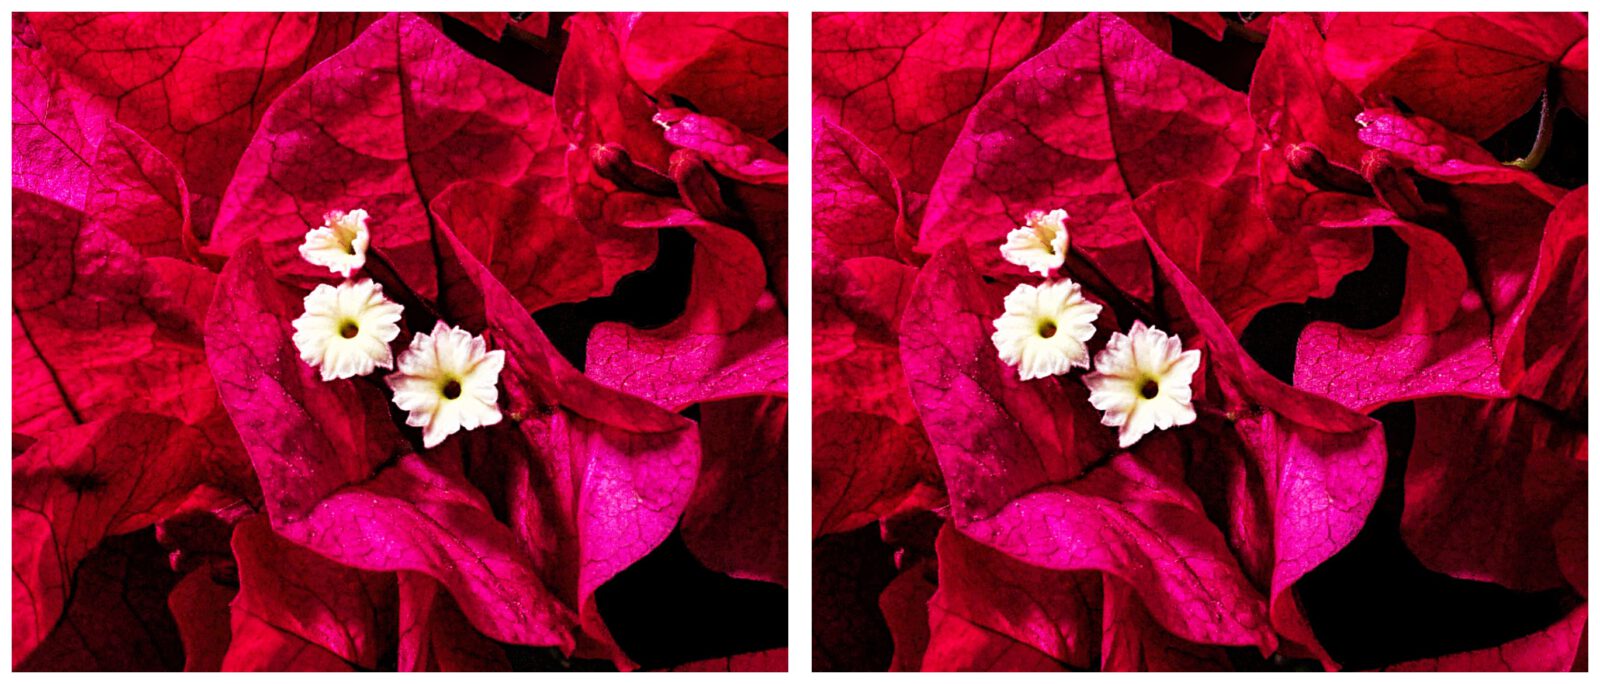
In the next photo, everything is far behind the stereo window. This again causes a bit of “shimmering” on the left and right sides of the image because so much of what appears at the edges doesn’t match up between the left and right. However, this version isn’t that unpleasant to view.
The third image has everything in the image set just behind the window. It’s comfortable to view, doesn’t have a lot of shimmering at the edges.
If the differences pointed out here aren’t obvious to you, don’t worry. Your sensitivity to how the window is adjusted depends on a few factors. First there are individual variations in how we each perceive stereo photos, and our tolerance for these adjustment factors. Next, the size of your display, and your distance from it, are also important factors. If you’re viewing this tutorial on a small phone screen, it’s quite possible that you either won’t see the differences between the last three photos, or won’t be bothered by them if you do. But, as display size goes up, these differences become much more noticeable and disturbing. When viewed on a large screen 3D TV, or if projected on a large screen, even much smaller differences than those illustrated here can produce a significant amount of viewing discomfort. The takeaway from this is that if you’re only showing your images on Instagram, you don’t need to worry about all this nearly as much as if you’re projecting them for a crowd.
How Do I Control the Stereo Window?
So, if you now understand the need to set the position of your subject matter with respect to the stereo window, the next question is how to accomplish that. That turns out to be the easy part.
Two of the applications that can be used to readily perform this adjustment are the Windows-based program StereoPhotoMaker, and the corresponding iPhone/Android app, 3DStereoid (both produced by Masuji Suto). No matter which program you use, the very first step you should take, before performing this window adjustment, is to “auto-align” your image. This gets rid of any vertical, rotational, perspective or other misalignments that can make a 3D image uncomfortable to view.
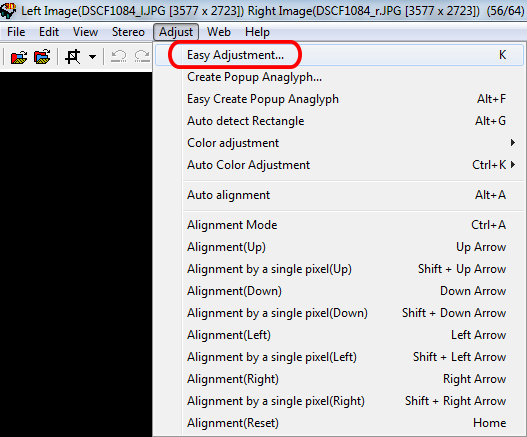
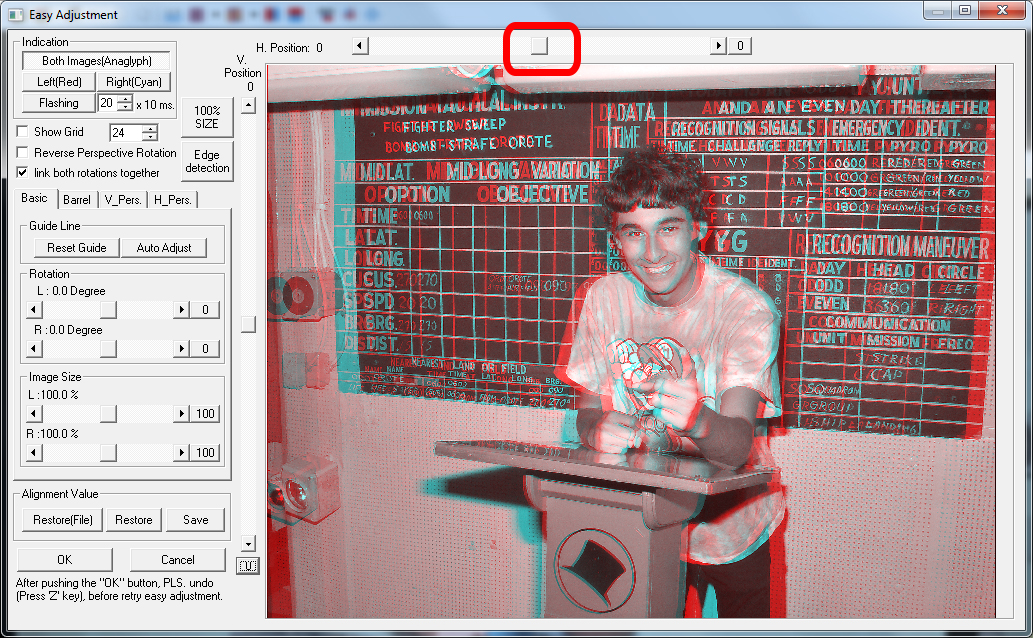
With auto-alignment complete, set the window in StereoPhoto Maker by going to the “Adjust” menu, and then selecting “Easy Adjustment.” This brings up a large dialog box with lots of options, along with your image displayed in anaglyph (red/cyan) format. To adjust the window, just use the slider at the top of the window (indicated in red). This allows you to move the two images horizontally relative to each other. As explained previously, this will change the relationship of your subject matter to the stereo window.
Another option in StereoPhoto Maker is to stay in the main program window, and then just use the left and right arrow keys to make this adjustment. Each press of the arrow key shifts the image a small amount, so it’s easier to use the Easy Adjustment menu if a large shift is needed in order to get the right window setting. This adjustment can be performed with your image displayed in virtually any format; anaglyph, parallel pair, cross-eye pair, and so on. So, you should probably choose a display method which you are actually able to view in 3D.
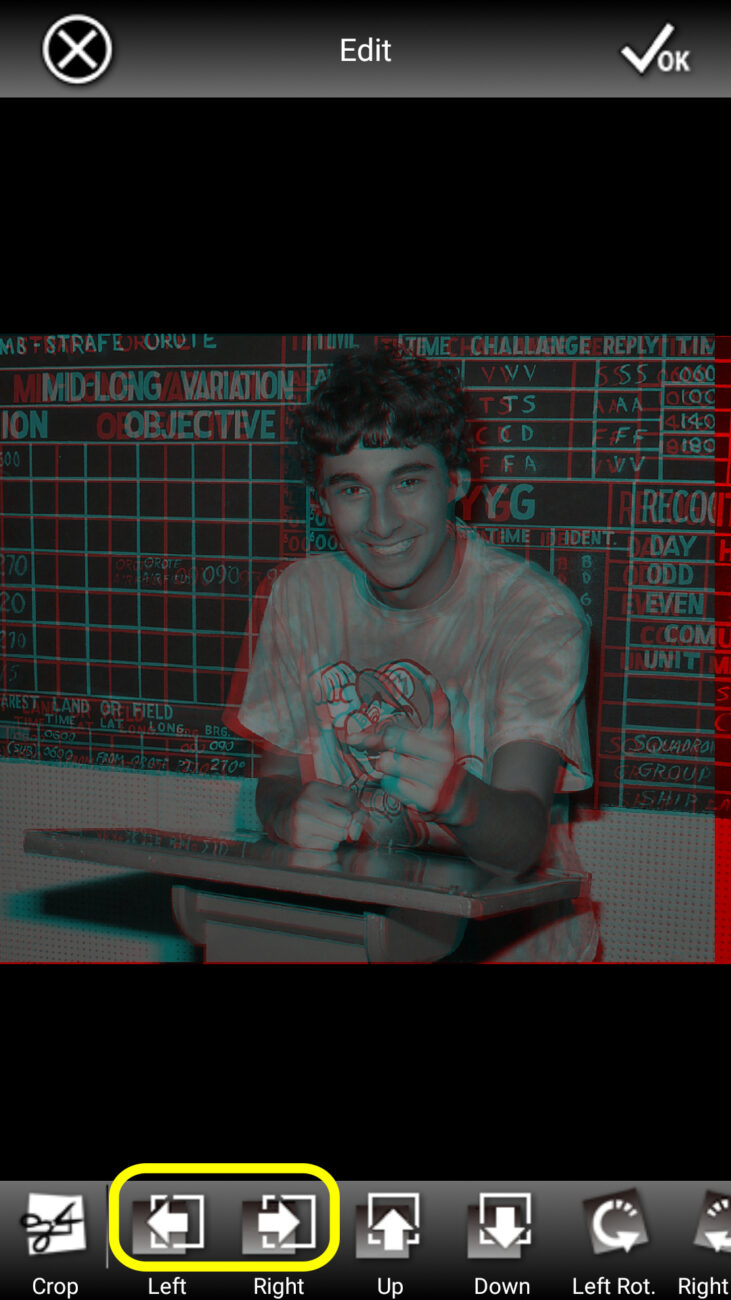
In the 3DStereoid app, this same functionality is available by selecting “Edit” from the main menu. Then, the left and right arrow buttons (indicated in yellow in the graphic) will shift the images relative to one another.
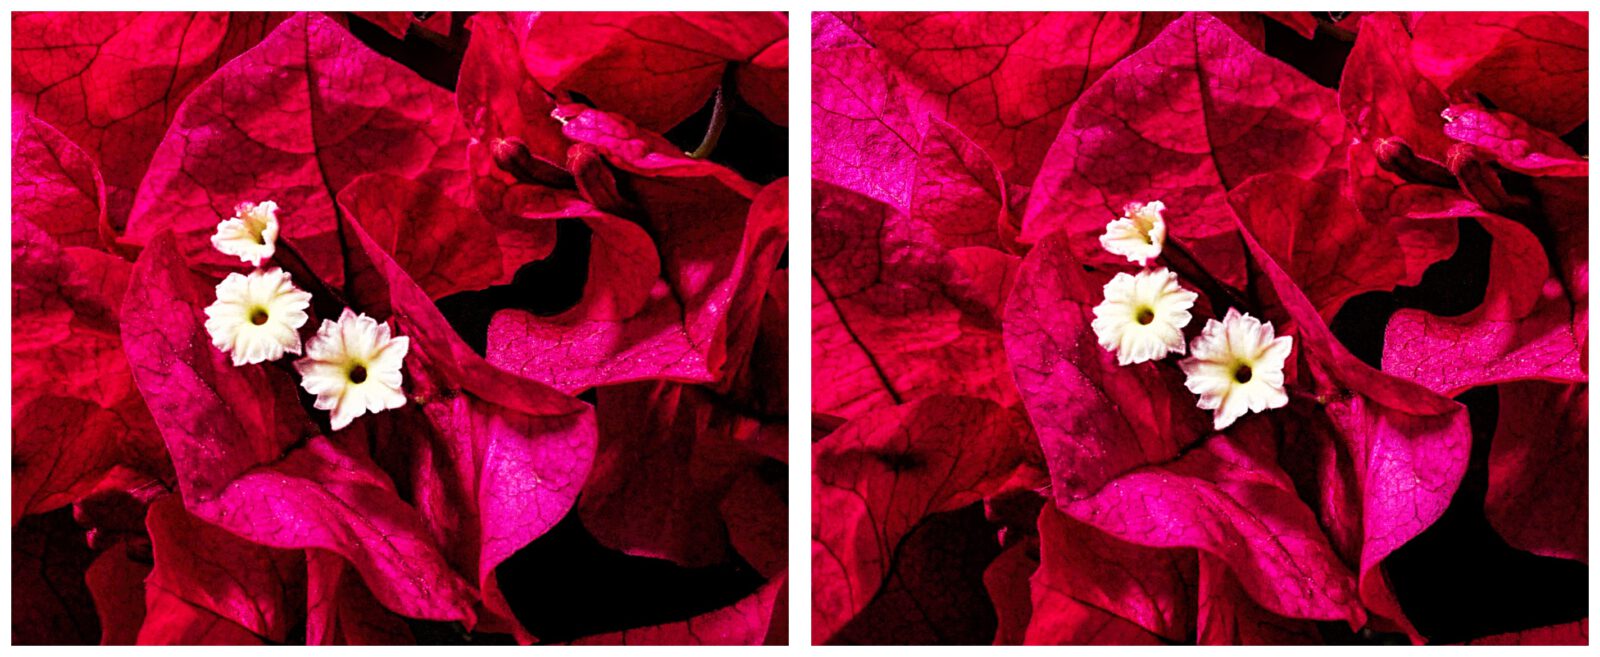
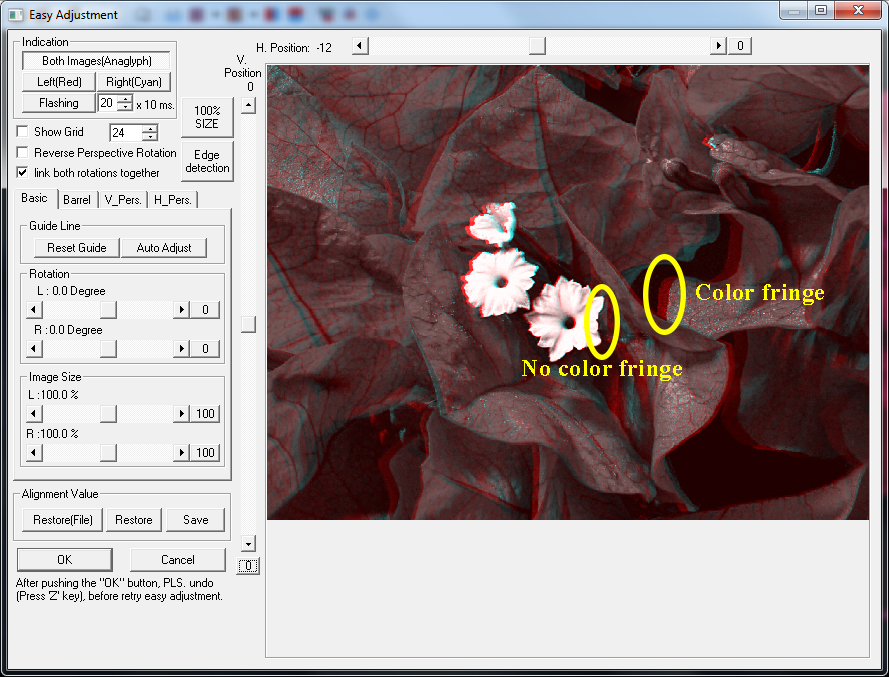
How do you know when you’ve got it right? Any part of your photo that doesn’t have a red or blue fringe (that is, the red and blue images are perfectly overlapped there) when viewed in anaglyph is right at the stereo window. This situation is illustrated in the next graphic, which shows that the right side of the rightmost flower in the image has no color fringing, and will therefore be exactly at the stereo window in terms of depth. The petal next to that does show a fringe, and won’t be at the window. It can be helpful to view your image through anaglyph (red/cyan) glasses during this process to visualize the relationship of subject material to stereo window, or alternately, in another format that you can actually view in stereo. Often, a final step of cropping your 3D image may be helpful after setting the window. This can be helpful to eliminate parts of your photo that don’t match up well or are visually distracting after windowing has been performed.
Conclusion
Hopefully, this tutorial has shown you the need for stereo window adjustment and it’s benefits, and given you a simple, easy to use method for performing that adjustment. The key takeaways to remember are:
- “Shoot loose.” That is, be aware when you’re taking your photo that you’ll probably end up losing some of it on top and bottom during auto-alignment, and on the left and/or right during windowing. So, purposefully include a bit more on all sides to accommodate this eventuality.
- The depth contained within your image is determined when you take it, and can never be changed. What you can change during subsequent adjustment is the relationship between you subject matter and the stereo window (the frame of the photo).
- Always perform an auto-alignment on your 3D image(s) first, before commencing any other processing operations.
- You’ll often want to perform a final cropping step after windowing an image to “clean it up.” That is, crop out anything that somehow got cut off by the process or doesn’t look right.
- Windowing can help make your photos easier to view, and should be done on every single 3D image you make. But, it becomes increasingly important as you go to larger displays. So, it’s not nearly as important for images intended for viewing on a small cellphone screen, but it’s absolutely critical for large screen projection. But, it’s easy to do, so why not get in the habit right now?
David Kuntz (Rancho Palos Verdes, California, USA)
I started in 3D photography with a Stereo Realist camera in 1978, and have been an active member of the LA 3D Club (Stereo Club of Southern California) since 1980. I’m also part of the Support Panel of this website. If you would like to know more about me visit the Support Panel page.
Instagram-profile: hubbledoge